The blue Pantera owners manual covers the clutch free play adjustment on page 62 and more detail is savable in the Technical Service Bulletin (TSB) No. 10. Although there is detailed information in the manuals about the adjustment, it seems to be easily misunderstood. Please be sure to read the owners manual and TSB before starting this adjustment.
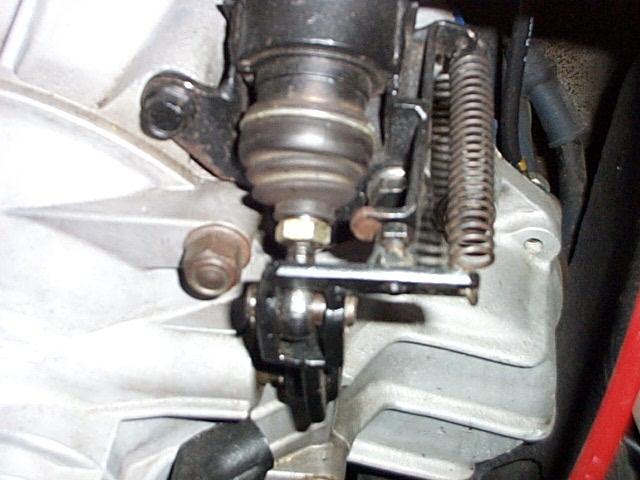
View of the Pantera clutch slave cylinder located on the passenger side of the bell housing
Free play is required in the Pantera cluch system to keep the throwout bearing from contacting the clutch fingers when the clutch is disengaged. If the throwout bearing is in constant contact with clutch fingers, the throwout bearing will fail prematurely or the clutch can slip. The deign of the clutch system in the Pantera and the limited movement of the hydraulic clutch system mandates that all components work perfectly for the ZF to shift correctly and easily. When everything is to factory specs it works very well.
I find that it is helpful to remove the return spring on the clutch arm so that it is easer to feel the free play in the clutch arm. I grip the back spring eye with the vice grips to remove the spring. I then attach a Crescent wrench on the top of the arm to check the free play movement of the arm. The wrench gives more leverage to feel the free play between the stop on the arm and when the throwout bearing contacts the clutch fingers. The wrench is not used to apply more force to the clutch arm, it's just used to feel the play. On the original installation of the ZF there are some torsion springs inside the bellhousing that are on the clutch release shaft that hold the clutch release fingers and throwout bearing away from the clutch fingers. The springs are fairly strong so it takes a little pressure to move them. Later on there was a TSB that said to remove them but I didn’t when I had my ZF out.
The adjustable stop bolt and lock nut is just to the left of the return spring and to the right of the slave piston push rod in the above image. As the clutch arm is moved to the back of the car, the throwout bearing will contact the clutch fingers inside the bell housing. At this point, more movement will start disengaging the clutch and resistance can be felt in the clutch arm. The free play can easily be felt by moving the arm back and fourth using the Crescent wrench. Some people like to do this with the engine running so there is more feel when the throwout bearing touches the clutch fingers. The free play movement is the distance from the stop position (arm forward) to when the throwout just contacts the clutch fingers (arm to the back). You will need to move the arm several times to get the feel of the throwout contacting the clutch fingers.
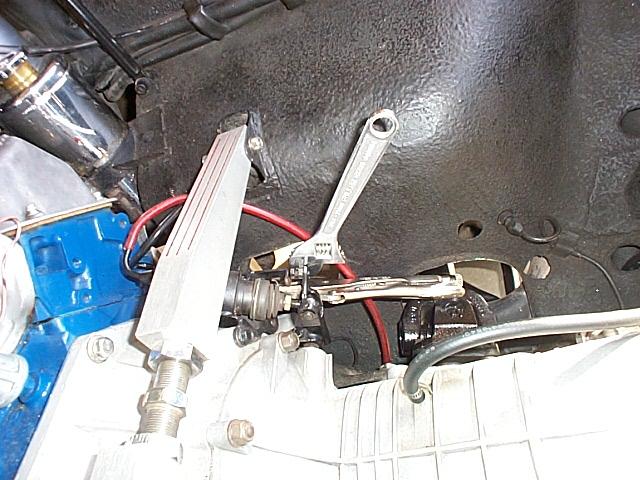
View of the Crescent wrench attached to the clutch arm and vice grips attached to the return spring. The return spring has been disconnected. Make sure that the clutch arm is tight on the end of the clutch shaft that goes into the bellhousing. The arm is held by a bolt and nut on the bottom area of the arm. Check to make sure that the lower front part of the arm is not contacting the bellhousing and restricting its movement when the clutch is released.
There must be enough free play to keep the throwout bearing from contacting the clutch fingers when the spring returns the clutch arm to the adjustable stop bolt. Too much free play will cause the clutch not to fully disengage and causes shifting problems with the ZF transaxle. The adjustment is made with the stop bolt and lock nut on the clutch arm. Some cars I've seen have a Allen head bolt rather than the flat head bolt that is on my car or the bolt is installed from the other side of the arm. The free play should be adjusted from .102" to .103". I like to keep the clutch arm free play at .102 and I check it often.
When the free play is correct and the master and slave cylinder is working correctly your Pantera should shift very easily. But, this requires that the clutch always be fully depressed when shifting. The clutch master cylinder can cause some deceptive problems when its seal is not working absolutely perfectly, e.g. reduced clutch release movement. When all of the clutch stuff is adjusted and working correctly I can shift from neutral directly into reverse without any problems. This is a good test of how well the clutch is releasing.
There is a lot of misinformation floating around about needing modified parts to make the system work but I've found that if the correct stock parts are used including the clutch plate and cover the system works fine. The clutch plate and the cover is unique to the Pantera. The plate has special flatter springs between the front and back surface and the cover does not have the counter weights found on most Ford clutches. The best bet on finding the correct parts is through our Pantera vendors.
There is another adjustment that is on the slave cylinder piston push rod that is used to adjust the home position of the piston that is inside of the slave cylinder but this should not be used to control the free play. From the center of the push rod eye to the end that contacts the slave piston it should be 3.07" to 3.09". long. This positions the piston so it does not bottom in the slave cylinder. If you take the push rod out to check this adjustment be sure that the slave piston does not fall out of the cylinder. Note the number of threads visible on the adjustable part of my push rod and that will give you an idea of how the push rod is adjusted on your car without removing it.